
Menu choice in advance only works when the basics are right. Guests need to be able to book online, the menu has to be correct, and the message has to arrive at the right moment. Then, on the day itself, your kitchen sees how many of each dish are coming. This guide walks you through setting up Waste Warrior step by step, with the buttons as you see them in the app. For each step, we explain why it matters: for your guest, and for what does or doesn't end up in the bin.
Already using a booking system? Then we connect it, your bookings come in automatically and you can mostly skip steps 1 to 3. Also read Connecting your booking system to Waste Warrior.
What Waste Warrior switches on for you
A few things aren't yours to set up. We get them ready for you:
- The parts you use. "Reservations" for tables, opening hours and bookings, plus menu choice for your reservations. If you don't see a part in the menu on the left, it's still switched off.
- Your channels. We set up email and WhatsApp in the order you prefer. More on that in step 5.
- Your restaurant going live. Messages only go out to guests once we've put your restaurant live. That way you can set everything up first, without pressure.
Your administrator adds colleagues under "Members". They then log in with their email address and a 6-digit code. Only administrators see "Settings". The agenda, the menus and the kitchen totals are open to everyone on your team.
Step 1: set up your floor with rooms, sections and tables
Your table layout decides which times a guest can pick online. If it's wrong, you sell seats that don't exist, or tables stay empty.
- Go to "Manage" → "Tables". Create your rooms with "New Room", for example Dining room and Terrace.
- Create one or more sections per room with "New Section". You can't move a section to another room later, so think the layout through.
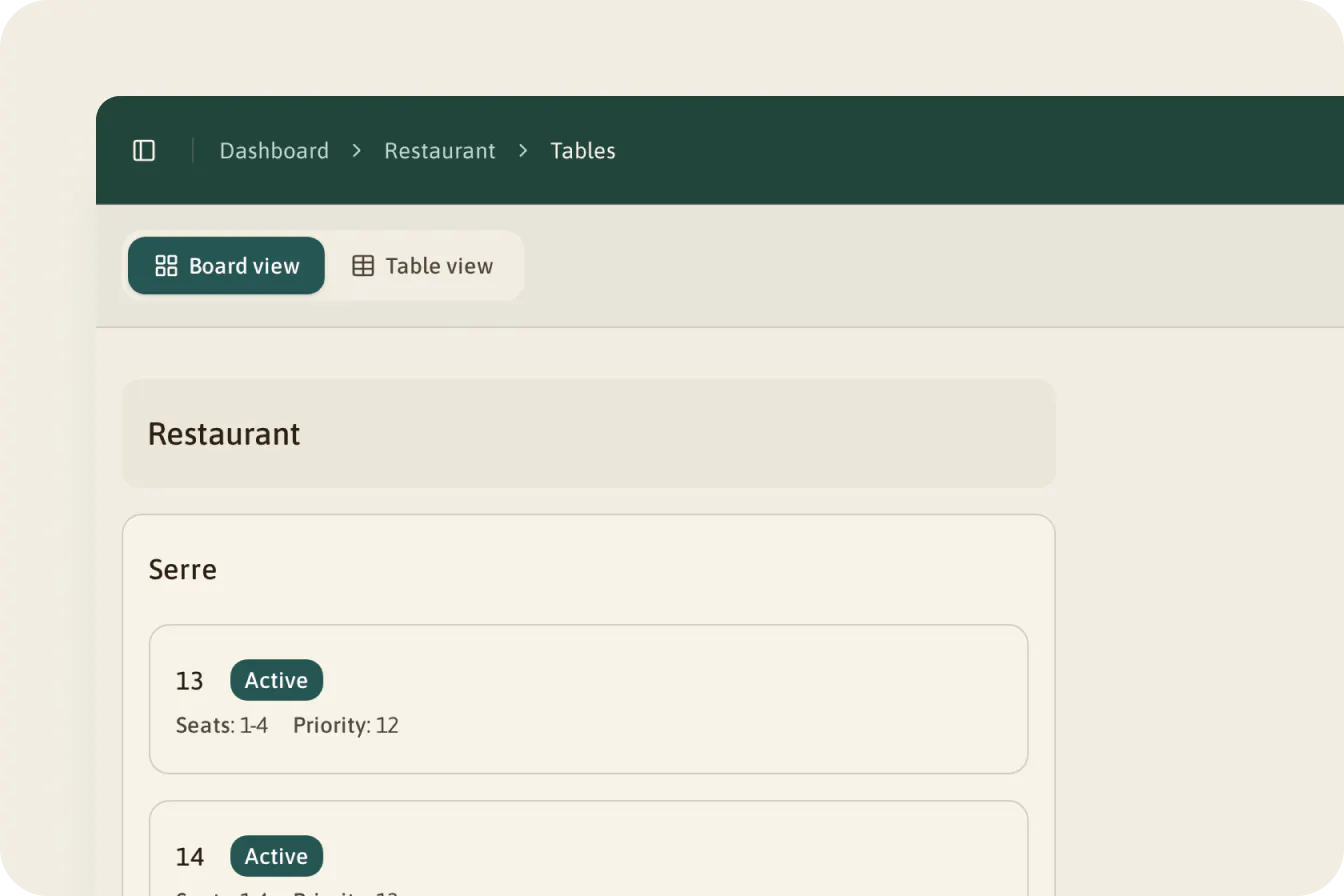
- Add tables with "Create a new table". Enter the name, the "Min. seats" and "Max. seats", the "Priority", and whether the table is "Active" and may be used for "Auto assign".
- In the "Board view", drag the tables into the order you want. You'll see the same order in the agenda.
- Go to "Table combinations" for tables you push together, for example for a group of eight. Pick the tables, name the combination and enter the number of seats yourself. The app doesn't add them up, because two tables pushed together often seat fewer people than apart.
How priority works
Priority runs from 0 (lowest) to 10 (highest). When a guest books online, Waste Warrior looks for a free table that's active, may be auto-assigned and fits the party size. The highest priority goes first, and on equal priority the smallest table. Then it looks at combinations.
So give the tables you like to fill first a high priority. A table you want to hand out yourself gets auto-assign switched off, and shows a red dot. If a table is out of use for a while, choose "Deactivate table".
Step 2: set opening hours, exceptions and booking rules
Guests only see times that actually work. And the length of a reservation decides how often a table turns over in an evening.
- Go to "Settings" → "Restaurant" → "Opening hours". Set your hours per day. With "Add time" you create several blocks on one day, for example 12:00–15:00 and 17:00–23:00. "Close restaurant" marks a regular closing day.
- Record exceptions under "Calendar" with "New calendar item". There are three types: "Set unique opening hour" (extra opening), "Close restaurant" (a public holiday, a private party) and "Adjust capacity" (a maximum number of guests for that day).
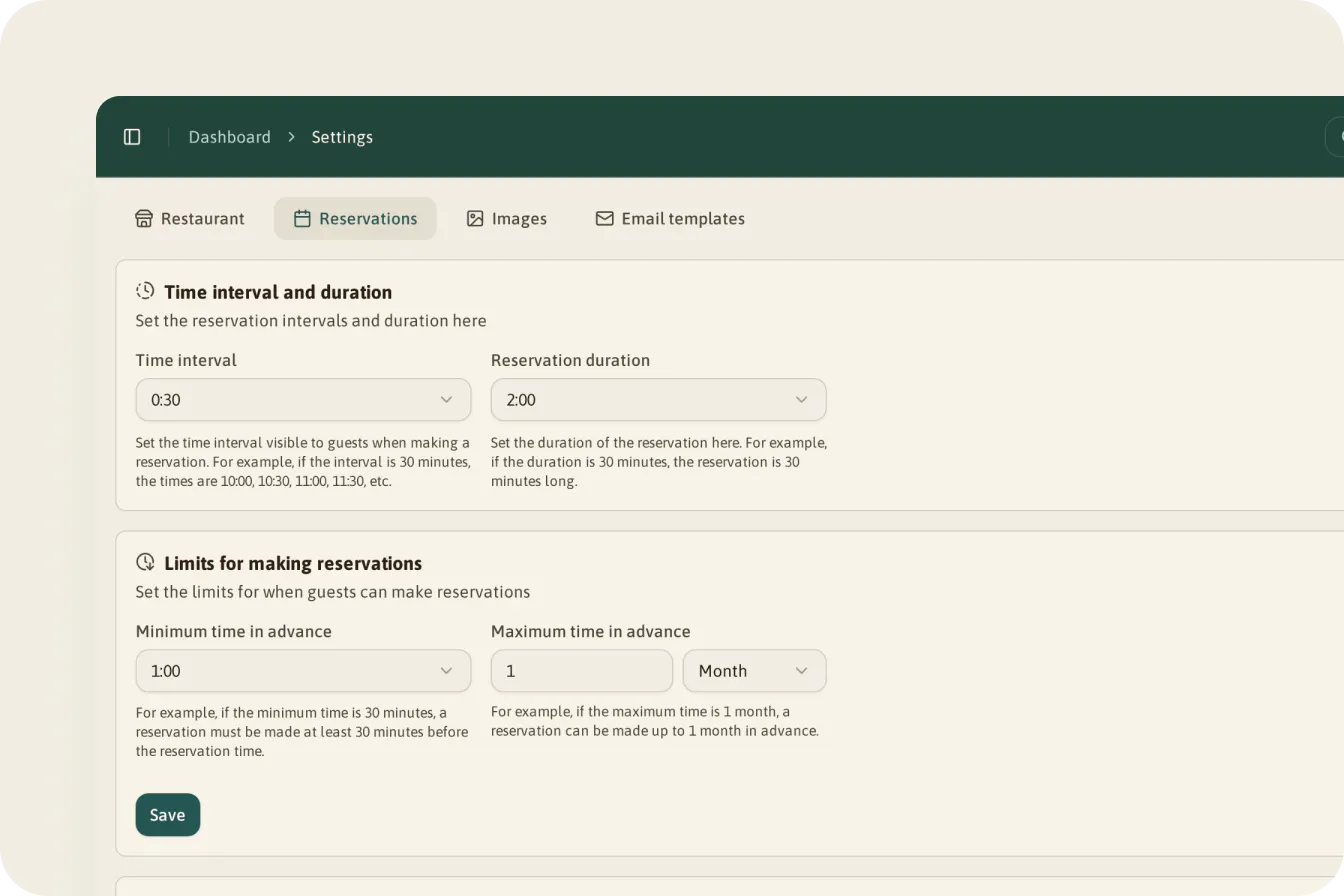
- Go to the "Reservations" tab → "Time interval and duration". The "Time interval" (15, 30, 45 or 60 minutes) sets the start times guests see. The "Reservation duration" is how long a table stays taken, 2 hours by default.
- Under "Limits for making reservations", set the "Minimum time in advance", 1 hour by default, and the "Maximum time in advance": how far ahead guests can book, 30 days by default.
"Adjust capacity" is useful on a day with fewer cooks. You take no more guests than your kitchen can serve well. That saves stress, and stress is a well-known reason kitchens over-prepare.
Step 3: put the booking widget on your website
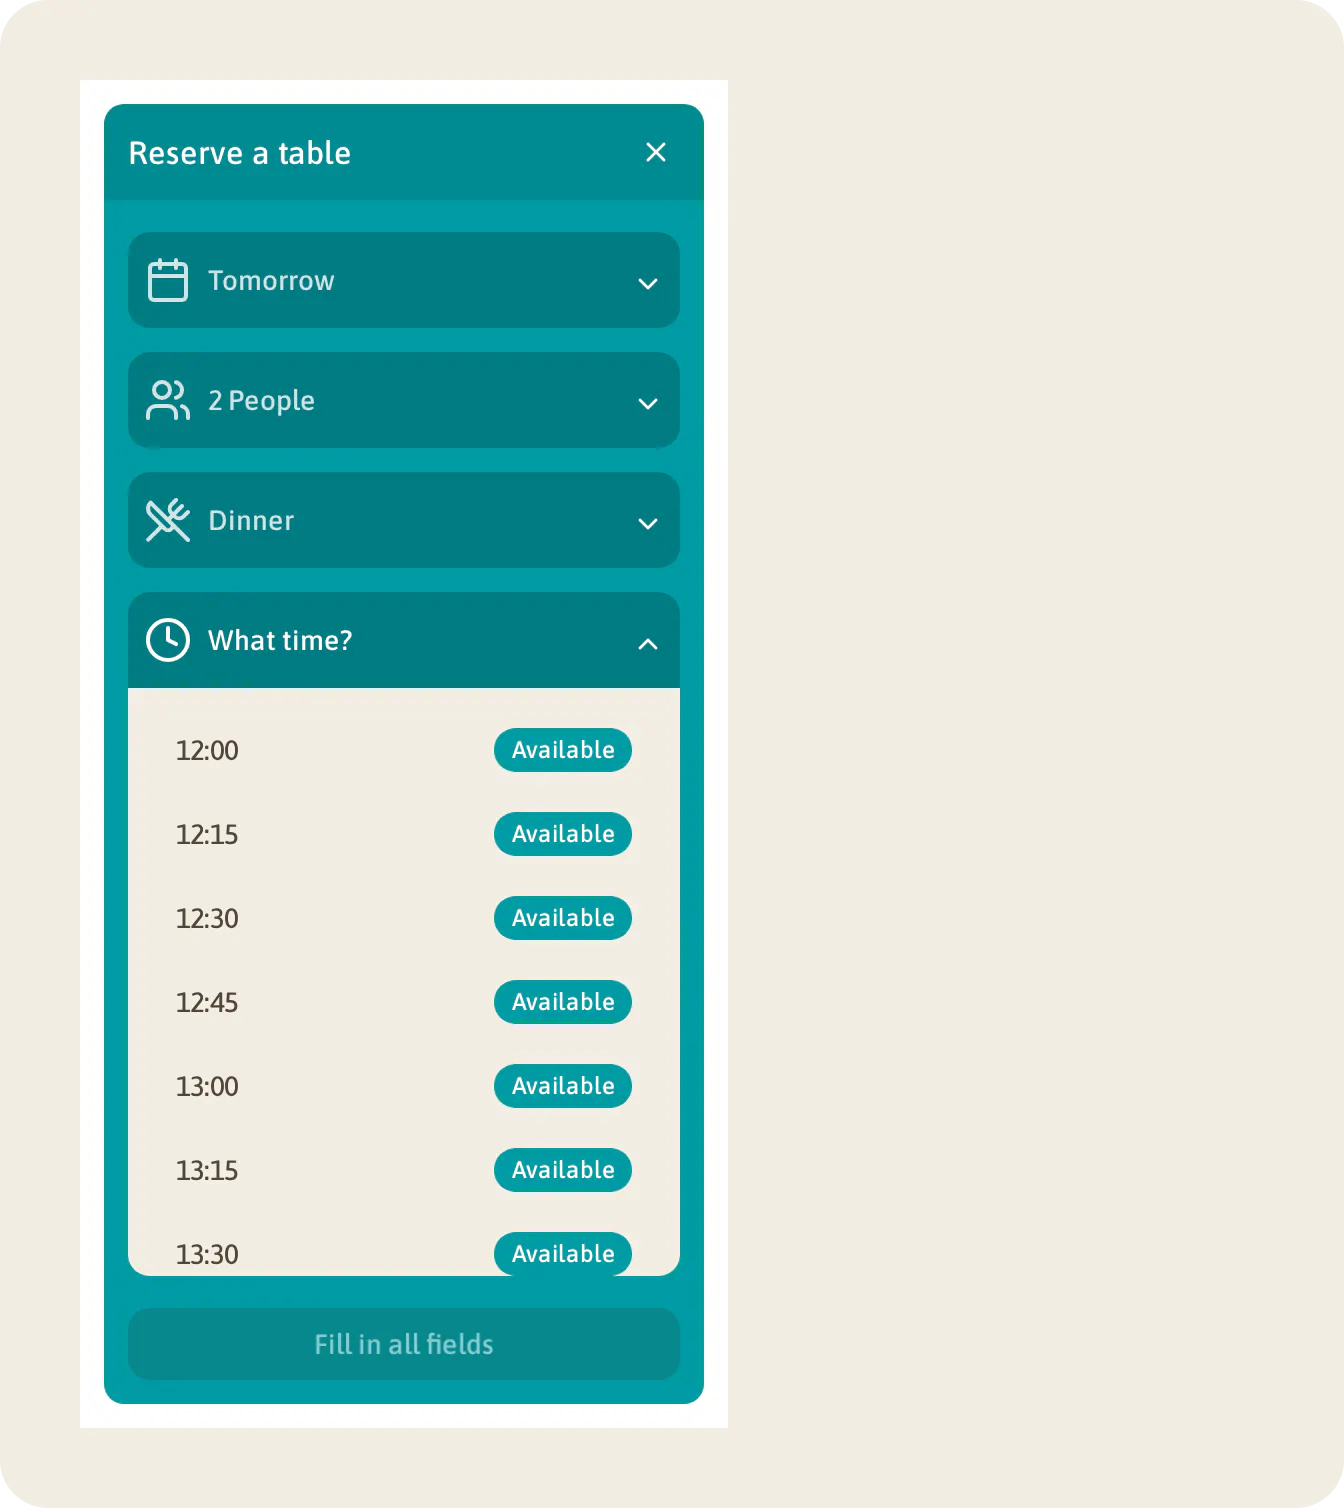
The widget is a "Reserve a table" button at the bottom right of your site. We give you one line of code, and you place it on your website.
The guest then goes through a few short steps:
- "When?": closed days can't be picked.
- "How many people?": up to eight people online. Larger groups are asked to call.
- "What are you coming for?": "Dinner" or "Drinks".
- "What time?": only free times can be picked.
- Name, email, phone number and dietary requirements. The last one is required, unless the guest ticks "I have no dietary requirements".
- "Confirm reservation".
There's deliberately no menu choice in the widget. Booking stays quick, and the guest chooses later, at their own pace, together with the rest of the table. Making dietary requirements mandatory helps your kitchen: you don't hear about a nut allergy for the first time at the table. The widget follows the browser language (Dutch or English). You can't set your own colours.
Once it's on your site, make a test booking with your own email address. Then you see exactly what a guest sees.
Step 4: build your menu with courses, dishes and allergens
Guests choose from this menu, and your kitchen totals follow the same structure. A clear menu gives better choices and a more useful list.
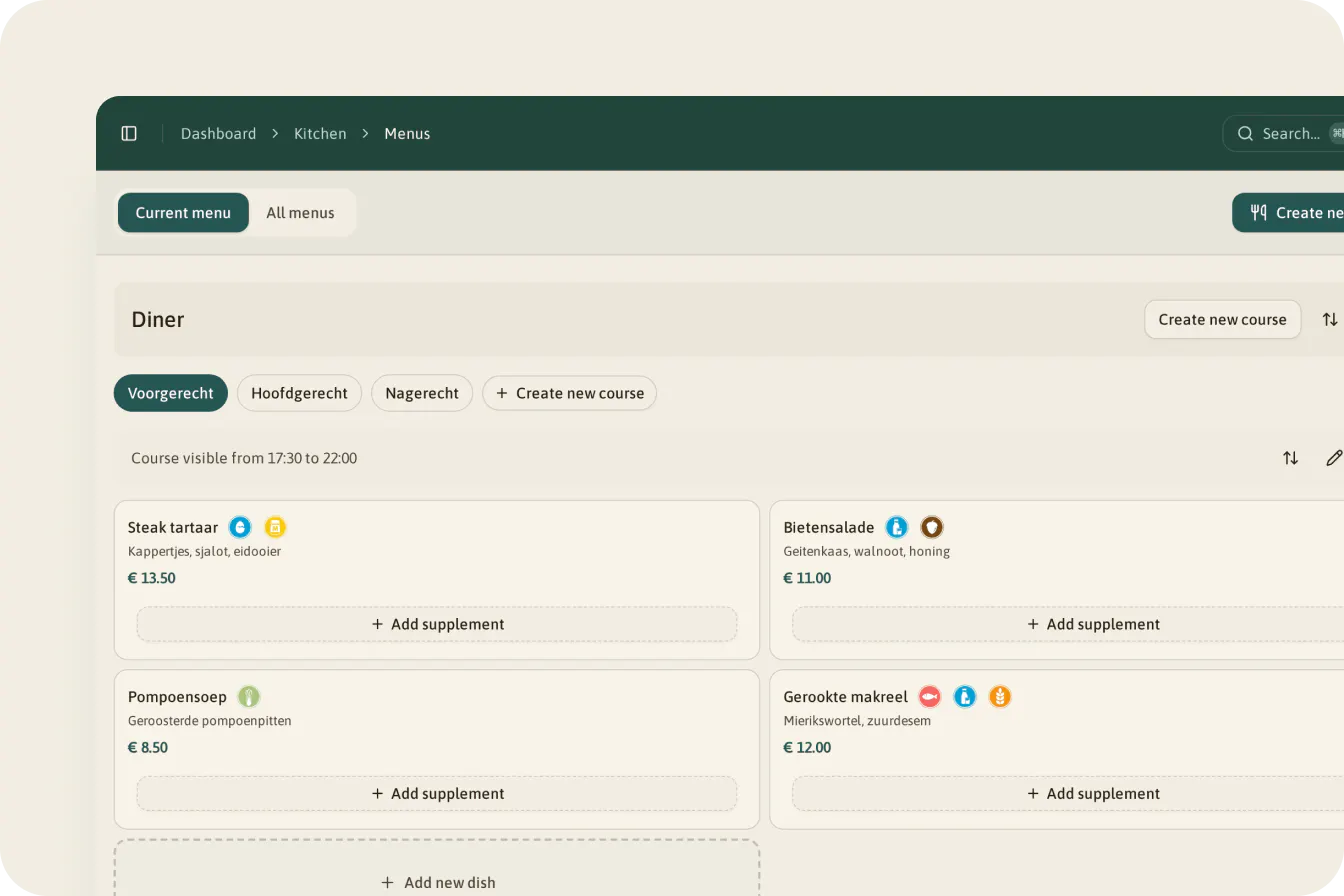
- Go to "Kitchen" → "Menus" and choose "Create new menu". Give it a name. Only tick "Make menu active" once the menu is finished.
- Create the courses with "Create new course": a name, a "Start time" and an "End time". A guest only sees courses whose times overlap with their reservation. So a lunch course from 11:30 to 15:00 doesn't show up for a dinner at 19:00.
- Add dishes per course with "Add new dish". Fill in the name and "Description", a "Price" if you like, and pick the "Allergies". Switch off "Active" when a dish can't be chosen for a while.
- Add extras per dish with "Add supplement", for example extra fries. Leave the price empty and the supplement is free.
- Put everything in the right order with "Reorder courses" and "Reorder dishes".
For allergies, you choose from the 14 EU allergens. Guests see the icons with the text "May contain traces of:". They type their own dietary needs themselves. You can't add photos to dishes yet, so the description does the work. For the rules, read Allergens and dietary needs in hospitality: rules and practice.
Only one menu can be active at a time. So prepare a new menu under "All menus" and make it active on the day you switch.
Step 5: choose the deadline, the incentive and your channels
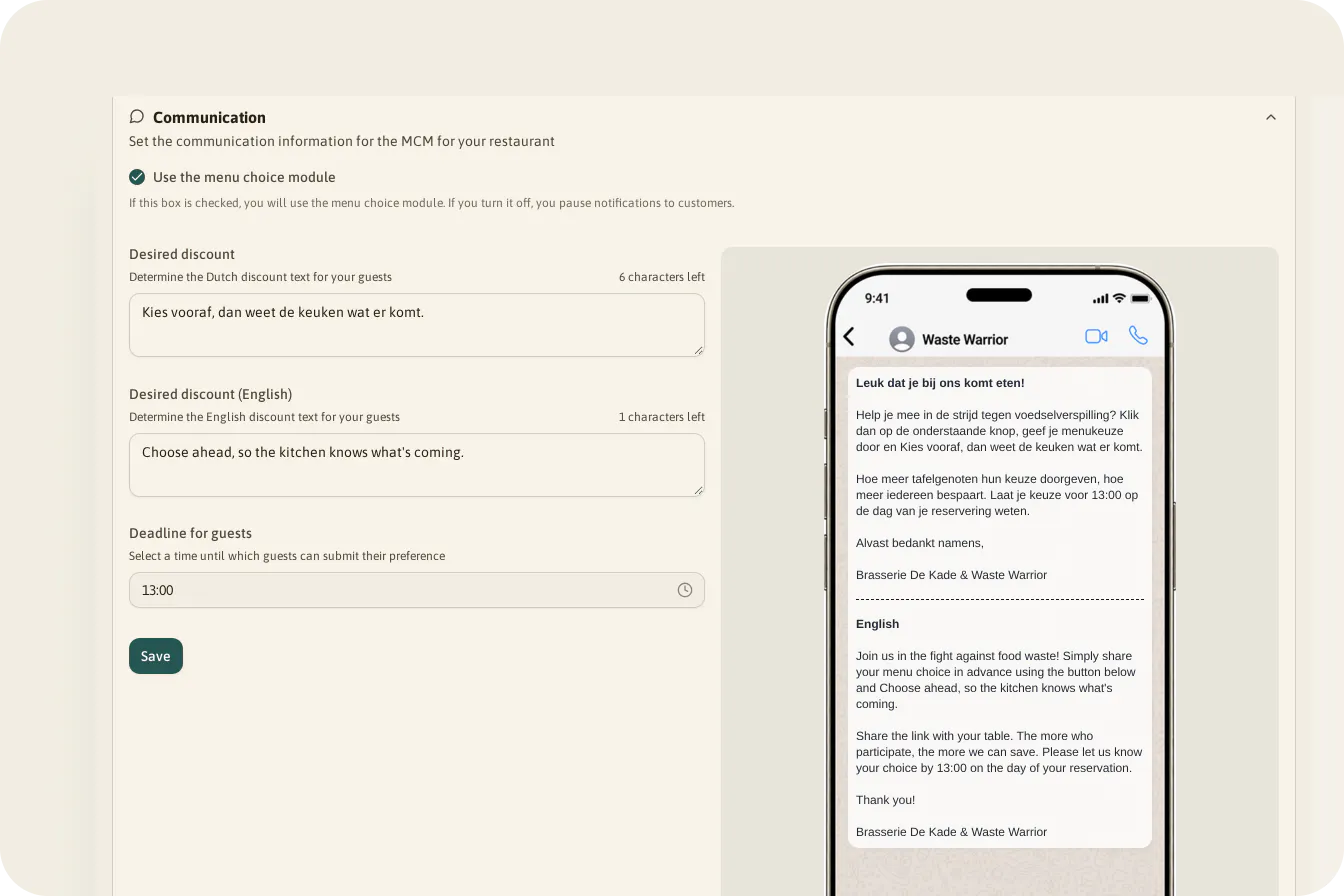
Go to "Settings" → "Reservations" → "Communication". This is where you decide when the kitchen knows what's coming, and why a guest would bother.
- Switch on "Use the menu choice module". If you switch it off, messages to guests are paused. To switch it back on, contact us.
- Choose the "Deadline for guests". By default it's 13:00 on the day itself, and you can change it in half-hour steps. Pick the moment your prep starts. An early deadline leaves more time for your supplier order; a later one gives guests more time.
- Enter the incentive under "Desired discount" and "Desired discount (English)", up to 50 characters each. For example: "get €2 off your bill". That text appears in the message and on the guest's page. You give the discount yourself, for example at the till.
- Agree with us which channels you use, and in which order: email, WhatsApp or both. If WhatsApp comes first and a WhatsApp message fails, an email goes out automatically. Our message system works with any channel, so we can add one on request, for example Signal.
On a wide screen you see a phone preview of the message on the right. Read it through before you save.
What your guests receive and can do themselves
This is what it looks like for a guest who books through your widget:
- A confirmation by email. It links to "Manage reservation", where the guest can change the party size, date, time and notes, or choose "Cancel reservation". Easy cancelling helps: research on cancellation policies recommends lenient rules with a simple way to cancel (Kim et al., 2025). A timely cancellation is a seat you can sell again, and a plate you don't make for nothing.
- A message with a personal link, by WhatsApp or email. No app or account needed.
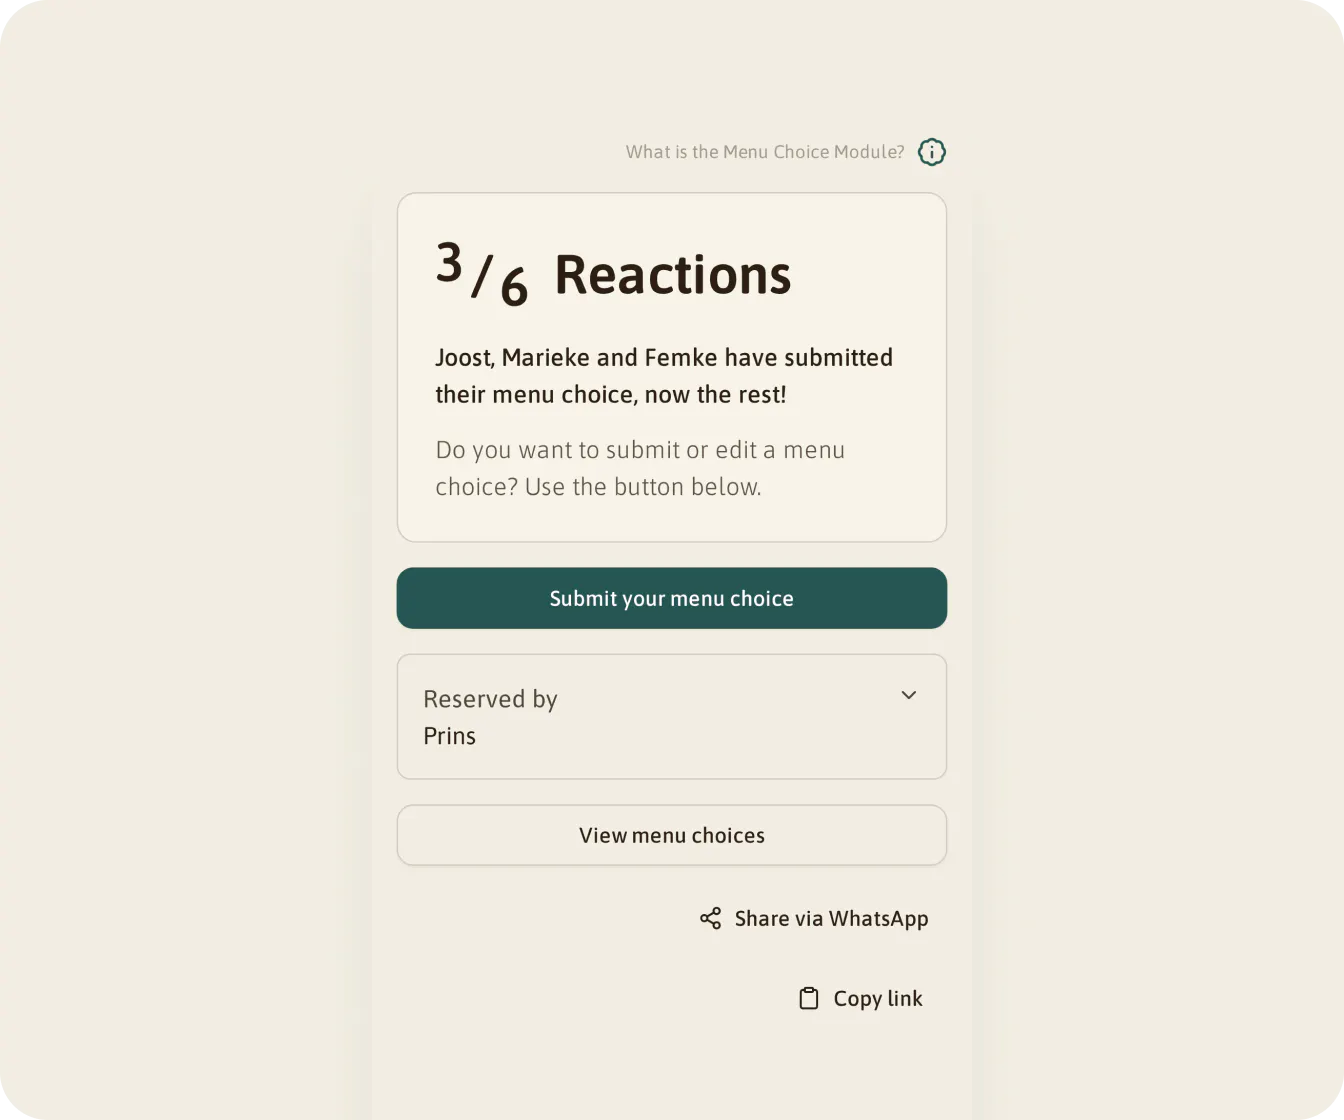
- One link for the whole table. With "Share via WhatsApp" or "Copy link", the guest passes it on. Each person picks or adds their own name, chooses dishes and supplements, adds anything under "Comments" and taps "Confirm your choice". Under "Reactions" the table sees who has already chosen. Anyone who can't come uses "Report absent".
- A reminder. If the guest booked more than 30 hours ahead and not everyone has chosen, a reminder follows 24 hours before. Once everyone has chosen, the guest gets a thank-you.
- After the deadline the guest can still view their choices, but no longer change them.
It's a preference, not an order: at the table, a guest can still change their mind. In a pilot at restaurant Bij Bram in Utrecht, 40% of guests with a reservation passed on their menu choice in advance (KHN, 2026, in Dutch). Guest pages are available in Dutch and English.
Step 6: work from the agenda and the kitchen every day
The agenda
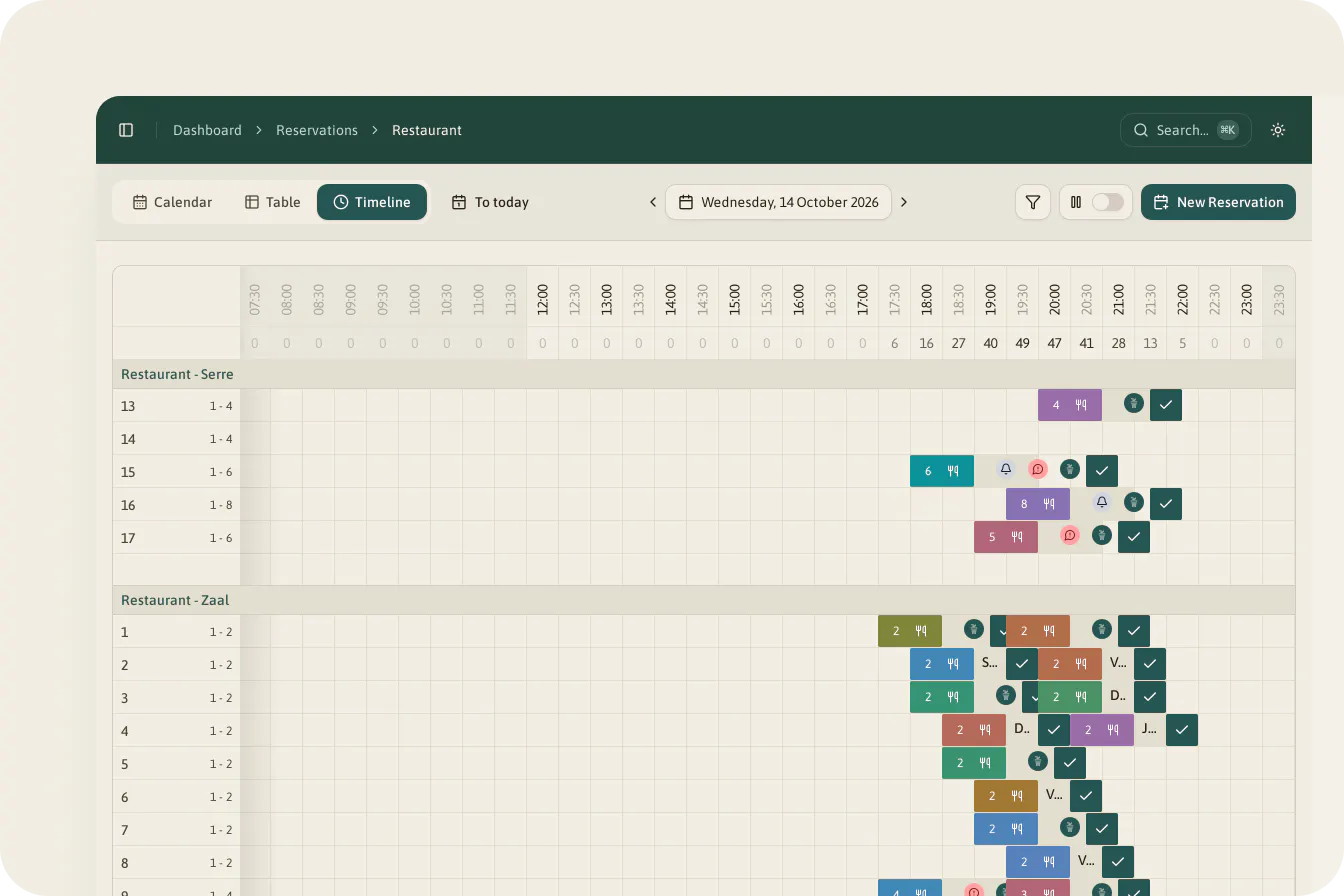
Under "Reservations" → "Restaurant", choose "Calendar", "Table" or "Timeline". In the "Timeline" you drag a reservation to another table or time. Reservations without a table sit at the top, in the "No table!" row. A dot labelled "Has MCM reactions" shows the table has already chosen. Add a phone booking with "New Reservation". Fill in the email address or phone number too, so that guest also gets the link.
Statuses
Use "Change Status" to follow the evening: "Accepted", "Arrived", "Seated", "Left", "Cancelled" and "No-show". Two things to remember:
- "Cancelled" tells the guest, "Delete" doesn't. If you cancel on a guest's behalf, choose "Cancelled". For "Accepted" and "Cancelled", you see beforehand whether an email goes to the guest.
- "Left" frees the table. Set it early, and the table becomes available again for later bookings.
Pause mode
At the top of the "Timeline" there's a "Pause mode" switch for the selected day. Switch it on and you receive no new reservations that day. Use it when your kitchen is full or someone calls in sick.
The kitchen totals
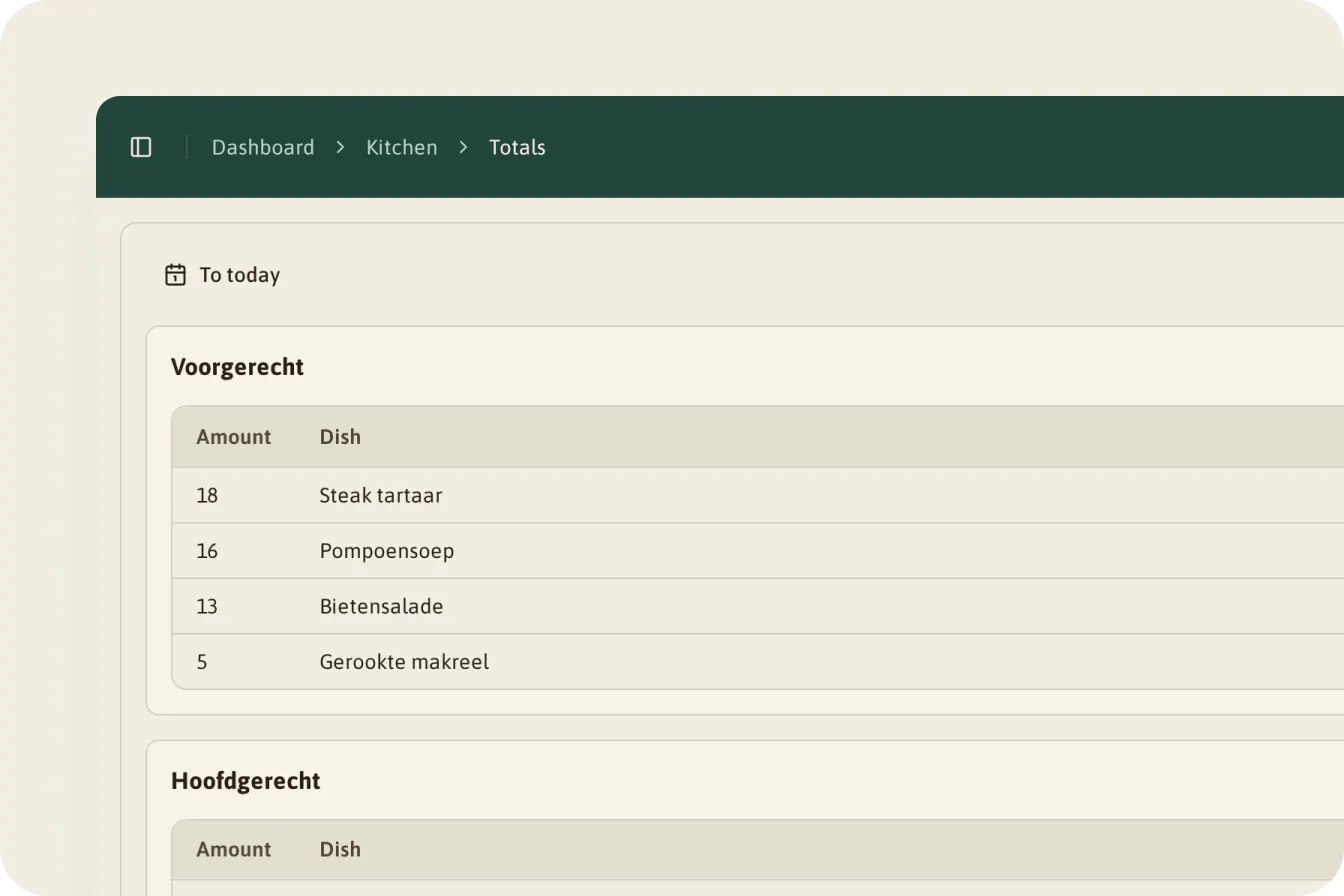
After the deadline, go to "Kitchen" → "Totals" → "Restaurant". Per course you see the "Amount" per "Dish", with the supplements, for the whole day. That's your prep list. To see who at a table chose what, open the reservation and choose "View menu choices", with the "Totals" and "Per person" tabs. That's also where you read comments, such as an allergy.
You can print or export the totals, or keep the screen open on a tablet in the kitchen. For guests who didn't choose in advance, you prepare as you always do. The difference is in the rest: when you guess, you cook extra to be safe. When you ask, you don't have to guess.
Step 7: learn from the statistics on your dashboard
The "Dashboard" has a "Menu choices" section. Pick a month and you see:
- "Conversion". How many reservations were "Eligible", meaning they got a message, and how many of those "Reacted".
- "Top 3 chosen dishes". Choose a top 3, 5 or 10, for all courses or one course.
- The least chosen dishes. These are just as interesting.
If few guests respond, look at your incentive and your deadline. If a dish is hardly ever chosen, prepare less of it, or take it off the menu. The figures cover the menu that's currently active.
Want to know where most of the waste in your kitchen comes from? Read Measuring food waste in restaurants: what it costs and where to start. Short answers are in the frequently asked questions about menu choice in advance.
How Waste Warrior Reservations helps your kitchen plan ahead
With Waste Warrior Reservations, little changes in how your guests book. They book through the booking button on your site or through your own booking system. Then they get one message with a personal link, by WhatsApp or email, which they share with the rest of the table. Everyone chooses on their own phone, without an app or account.
At the deadline, your kitchen sees how many of each dish are coming per course, with comments and allergies alongside. You build the menu yourself, with courses, supplements and the 14 EU allergens. The dashboard shows how many guests respond and which dishes sell.
There's no hardware to install and no long contract. There's no fixed price either: you start with a pilot at one location.
Curious how that would work in your restaurant? Plan a demo and we'll walk through it together.